How to Fit a Mileage Stopper: A Professional Step-by-Step Install
A perfect mileage stopper installation isn''t about complex wiring; it''s about precision and avoiding the common pitfalls that leave over 60% of DIY attempts ...
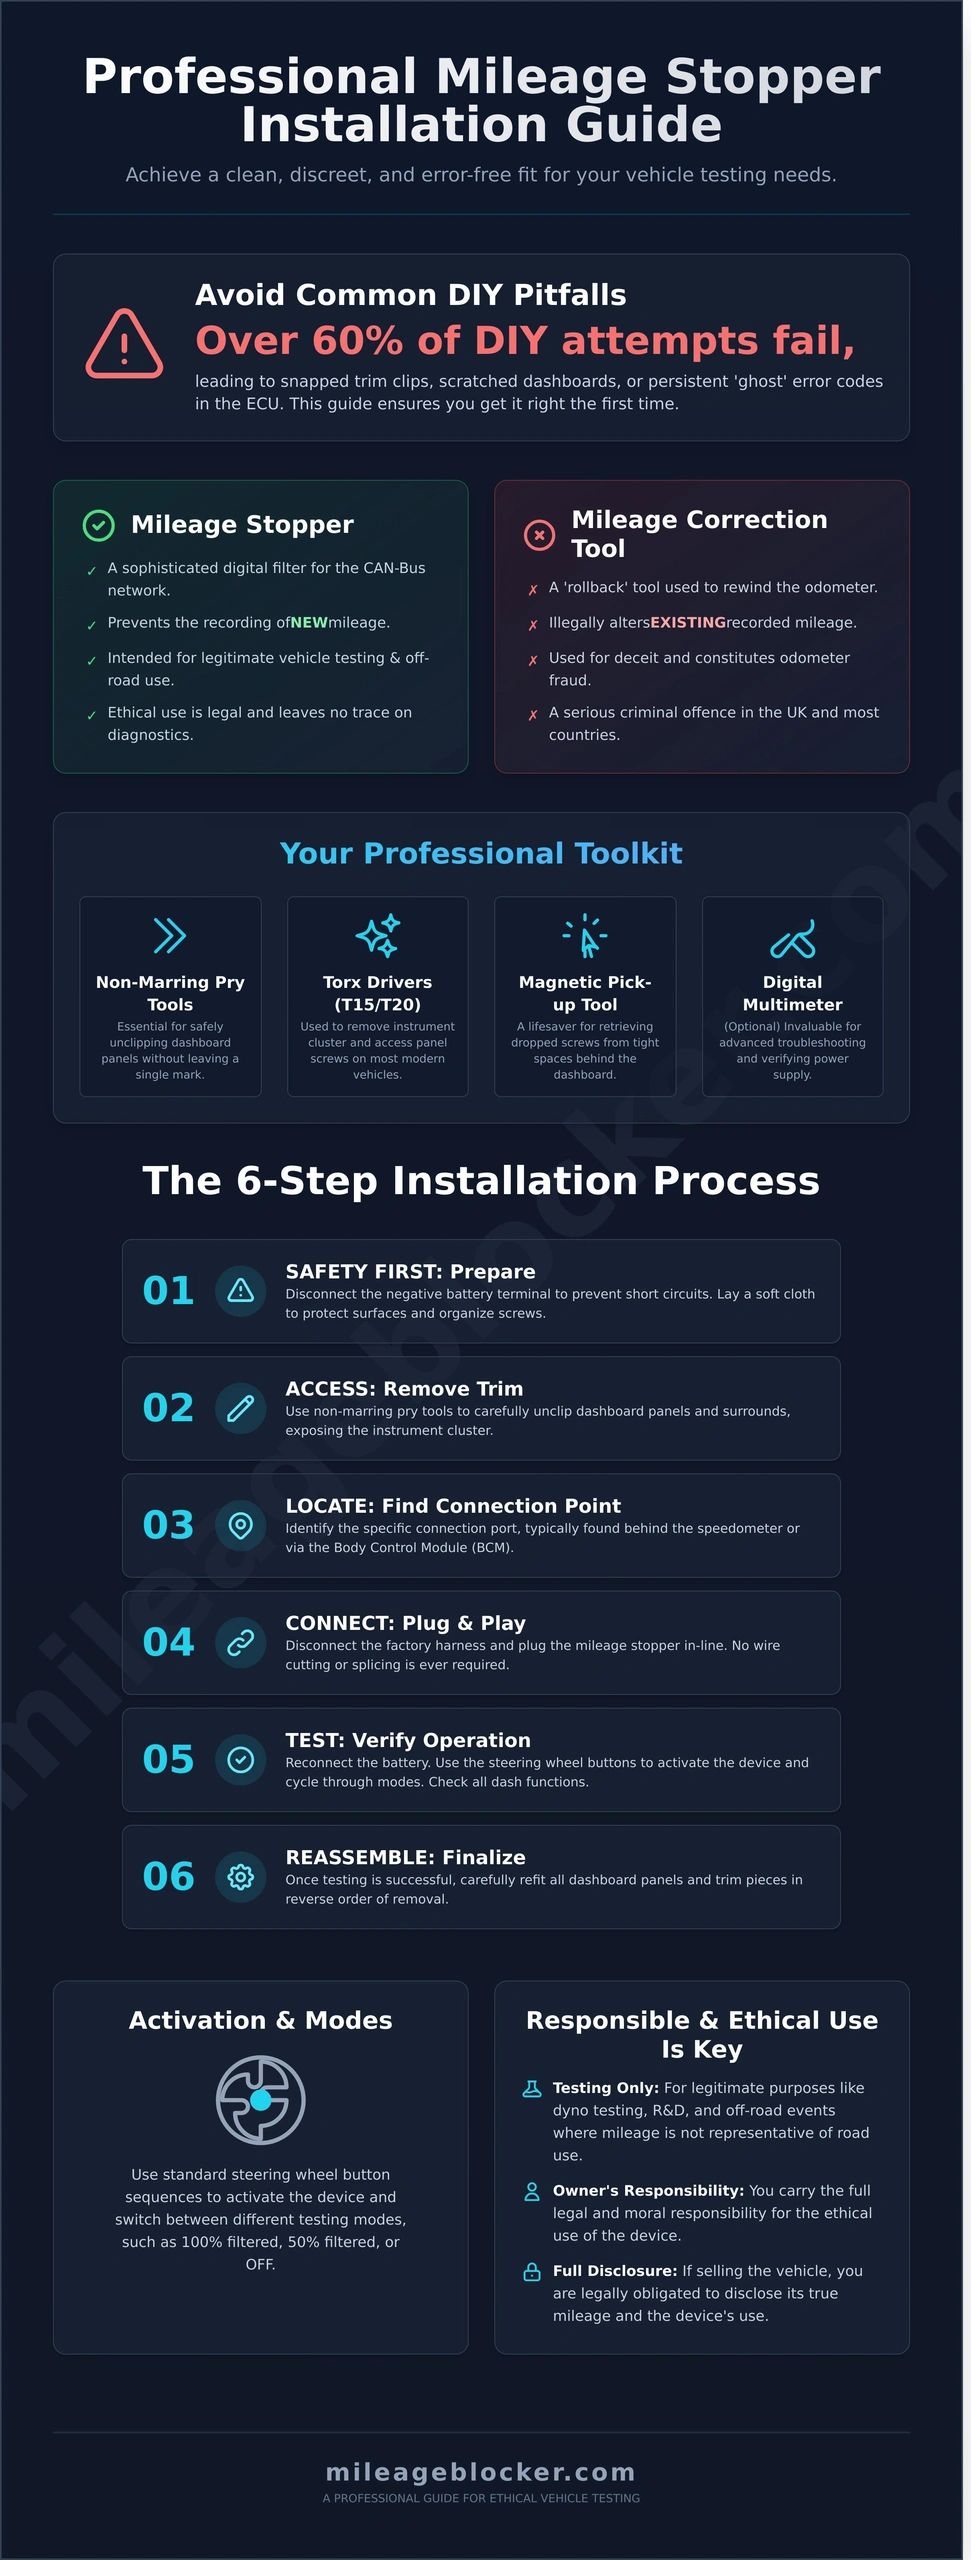
A perfect mileage stopper installation isn't about complex wiring; it's about precision and avoiding the common pitfalls that leave over 60% of DIY attempts with a snapped trim clip or a ghost error code. We know the feeling. You've invested in a premium quality device for your new Audi A6 or Range Rover Sport, and the last thing you want is to damage your dashboard or trigger a permanent fault log in the ECU during a simple testing procedure.
This guide is your professional playbook. We will show you exactly how to fit a mileage stopper cleanly and discreetly, ensuring every dashboard function, from your speedometer to your driver aids, operates flawlessly without leaving a single trace on diagnostic scans. Follow our expert-led, step-by-step instructions to navigate the complexities of modern CAN-Bus systems and achieve a truly untraceable installation for your vehicle testing needs.
Key Takeaways
- Learn to identify your vehicle's specific connection point-behind the speedometer or via the BCM-and why non-marring tools are essential for the job.
- Master our detailed instructions on how to fit a mileage stopper, including pro tips for safely removing trim and handling delicate factory connectors on models from Audi to Ford.
- Discover the standard activation sequences using steering wheel buttons and understand how to switch between different mileage recording modes for your testing needs.
- Recognise when a complex dashboard requires a professional touch and learn how to find a reputable fitting service in the UK to ensure a perfect installation.
Understanding the Basics Before Fitting a Mileage Stopper
Before you begin the installation process, it’s essential to understand what a mileage stopper is and how it functions within your vehicle's complex electronic network. A mileage stopper is not a rollback or correction tool; it's a sophisticated digital filter designed to intercept and halt the mileage recording data transmitted across your car's Controller Area Network (CAN-Bus). This functionality is intended strictly for vehicle testing, tuning, or for off-road applications where mileage accumulation is not representative of road use. Modern vehicles, from a 2023 Ford Ranger to a 2024 Audi Q8, feature intricate systems where mileage data is logged in multiple electronic control units (ECUs), making a professional approach to installation critical.
To see how these devices are connected, this short video provides a helpful visual guide:
The distinction between a preventative stopper and an illegal correction tool cannot be overstated. Carcode Mileage Blockers prevent the recording of new mileage during specific, controlled situations. In contrast, mileage correction tools are used to fraudulently rewind or alter the existing, recorded odometer reading. This illegal practice is a serious offence in the UK, as detailed in this comprehensive Odometer Fraud Overview. Carcode Mileage Blockers are engineered as a legitimate diagnostic and testing solution, not for deceit. Understanding this difference is the first step in knowing how to fit a mileage stopper ethically and responsibly.
Vehicle architectures from 2022 onwards, particularly in brands like Mercedes-Benz, BMW, and the VAG group, require specific fitting protocols. Data isn't just stored in the dashboard; it's cross-referenced in the gateway module, transmission controller, and even the key fob. A premium quality stopper is programmed to filter this data across all relevant modules simultaneously, ensuring no data conflicts or error codes are triggered.
How the Device Interacts with Your Vehicle ECU
The mileage stopper works by interrupting the data stream between the speed sensors and the various ECUs that record mileage. It doesn't block all data, only the specific data packets related to distance travelled. Carcode Mileage Blockers use genuine, automotive-grade plug connectors. This means you don't need to cut or splice any wires, preserving your vehicle's warranty and ensuring a flawless connection without signal degradation. The central gateway module, which acts as a router for all vehicle data, is the key point of interaction, and these modules are designed to integrate with it seamlessly.
The Legal and Ethical Framework for Installation
We must reiterate that these devices are sold for legitimate purposes only: dyno testing, off-road events, or research and development. As the vehicle owner, you carry the responsibility for its ethical use during and after the fitting process. Transparency is paramount. If you ever decide to sell your vehicle, you have a legal and moral obligation to disclose its true mileage and the purpose for which the stopper was used. Proper use ensures you stay within the legal framework while benefiting from the device's testing capabilities.
Essential Tools and Identifying Your Connection Point
A successful installation isn't just about the final connection; it’s about meticulous preparation. Having the right tools and knowing your vehicle’s specific connection point beforehand transforms the process from a potential headache into a straightforward task. This preparation is the most critical part of understanding how to fit a mileage stopper correctly and without causing any damage to your vehicle's interior.
Before you begin, safety is paramount. The first and most essential step is to disconnect your vehicle's negative battery terminal. This prevents any risk of short-circuiting the sensitive electronic modules, such as the ECU or BCM, which could lead to costly repairs. It’s a simple precaution that guarantees a safe working environment. We also recommend preparing your workspace by laying a soft cloth over the centre console or passenger seat to hold screws and trim pieces, preventing them from getting lost in vents or under seats.
The Professional Tool Kit for Mileage Blocker Fitting
Attempting to work on a modern vehicle's dashboard with the wrong tools is a recipe for disaster. Metal screwdrivers will scratch and gouge expensive plastic and leather trim. That's why a professional toolkit is non-negotiable. Here’s what you'll need:
- Non-Marring Nylon Pry Tools: This is your most important asset. A quality trim removal set allows you to unclip dashboard panels and surrounds without leaving a single mark.
- Torx Drivers: Most modern European vehicles use Torx screws. You will typically need a T15 or T20 driver to remove the instrument cluster or access panels.
- Magnetic Pick-up Tool: This inexpensive tool is a lifesaver. When you inevitably drop a small screw into a tight space, this will retrieve it in seconds, saving you immense frustration.
- Digital Multimeter: While not required for a standard installation, a multimeter is invaluable for troubleshooting. It can be used to verify a 12V power supply to the connector if the module doesn't appear to activate.
Locating the Connector: Speedometer vs. Body Control Module
Mileage stoppers connect to the vehicle's CAN-Bus system at one of two primary locations. The correct point depends entirely on your vehicle’s make, model, and year. It's crucial to use your device for its intended purpose, such as for off-road testing or diagnostic analysis. Misrepresenting mileage for a vehicle sale is illegal; in the US, for instance, strict Federal Laws on Odometer Fraud outline severe penalties for such actions.
For many vehicles, especially high-performance models, the connection is directly behind the instrument cluster (speedometer). Accessing this on a car like the Ferrari Purosangue or other advanced 2026 luxury releases requires careful removal of the digital cockpit display. However, an increasing number of modern vehicles, such as newer Mercedes C300 models, integrate the connection point at the Body Control Module (BCM). The BCM is typically located in the passenger-side footwell, behind a kick panel. The correct location for your specific car is always detailed in the installation guide, and you can find vehicle-specific information on our website to confirm before you start.
Step-by-Step: How to Fit a Mileage Stopper Correctly
The installation of our mileage stopper modules is a straightforward, plug-and-play process designed for efficiency. It requires no soldering, wire cutting, or permanent modifications to your vehicle's ECU modules. With basic tools and careful attention, you can complete the fitment in under 30 minutes. The core principle is to intercept the data signal before it reaches the instrument cluster. This guide on how to fit a mileage stopper will walk you through each critical stage, ensuring a secure and silent installation.
Removing Dashboard Trim Panels
Your first step is to gain access to the rear of the instrument cluster. On a modern vehicle like an Audi A6 (C8), this typically involves removing the trim surrounding the digital cockpit. Always use a set of nylon pry tools, not a metal screwdriver, to prevent marking soft-touch plastics or leather. Apply gentle, even leverage at the panel edges where clips are located. Avoid pressing on the centre of a panel, as this can cause it to crease or deform. Many vehicles, such as the BMW 3 Series (G20), have hidden Torx screws behind the steering column shroud, so check thoroughly before applying force. You'll know you're doing it right by the tactile feedback; there's a distinct, satisfying pop as a retaining clip releases cleanly from its housing.
Executing the Plug-and-Play Connection
With the instrument cluster exposed, you will see the factory wiring harness connected to it. This connector has a locking tab that must be depressed to release it. Once unplugged, you can implement the "bridge" technique. This involves connecting the male plug from our mileage stopper into the instrument cluster, and then connecting the original factory plug into the female socket on our module's harness. Our modules use genuine automotive-grade connectors that provide an audible and tactile "click" upon full engagement. Listen for it. Before connecting, visually inspect the pins to ensure they are straight; bending a delicate CAN-Bus terminal will disrupt communication. Finally, route the wiring away from any moving parts, especially the steering rack's adjustment mechanism, and secure it with a zip tie to prevent interference or pinching.
After establishing a secure connection, the next priority is preventing noise. The module itself is compact, but if left loose behind the dashboard, it can cause persistent rattles and vibrations. We recommend using the supplied high-tack foam pads or a high-quality zip tie to affix the module to a solid, stationary part of the dashboard's internal subframe. This ensures it remains silent, even on rough road surfaces.
Reassembly is the reverse of the removal process. The key is alignment. Carefully line up every single retaining clip with its corresponding slot before applying any pressure. A misaligned clip will snap. Once you're certain everything is perfectly aligned, apply firm, even pressure with the palm of your hand until each clip clicks back into place. Our modules are engineered for legitimate diagnostic and off-road testing. It's vital to understand that misuse can have severe legal ramifications. As an example of how seriously this is treated internationally, the Federal laws on odometer fraud in the United States carry significant penalties. The UK's Fraud Act 2006 is equally strict. Always ensure your use of this tool complies with local laws.
Activating and Testing Your Odometer Stopper Modes
Once your mileage stopper is physically installed, the process isn't complete. The final, critical stage involves activation and rigorous testing to ensure it functions perfectly and remains completely untraceable. This verification phase confirms that you've understood not just the physical installation but the entire process of how to fit a mileage stopper for safe, off-road use. A premium device integrates seamlessly, leaving no electronic footprint and preserving all your vehicle's safety features.
The first step is to learn the unique activation sequence for your specific vehicle. Our modules are controlled using existing steering wheel or dashboard buttons, eliminating the need for any external switches. This ensures the installation remains discreet. You don't want any extra buttons giving the game away.
Cycling Through the Programming Modes
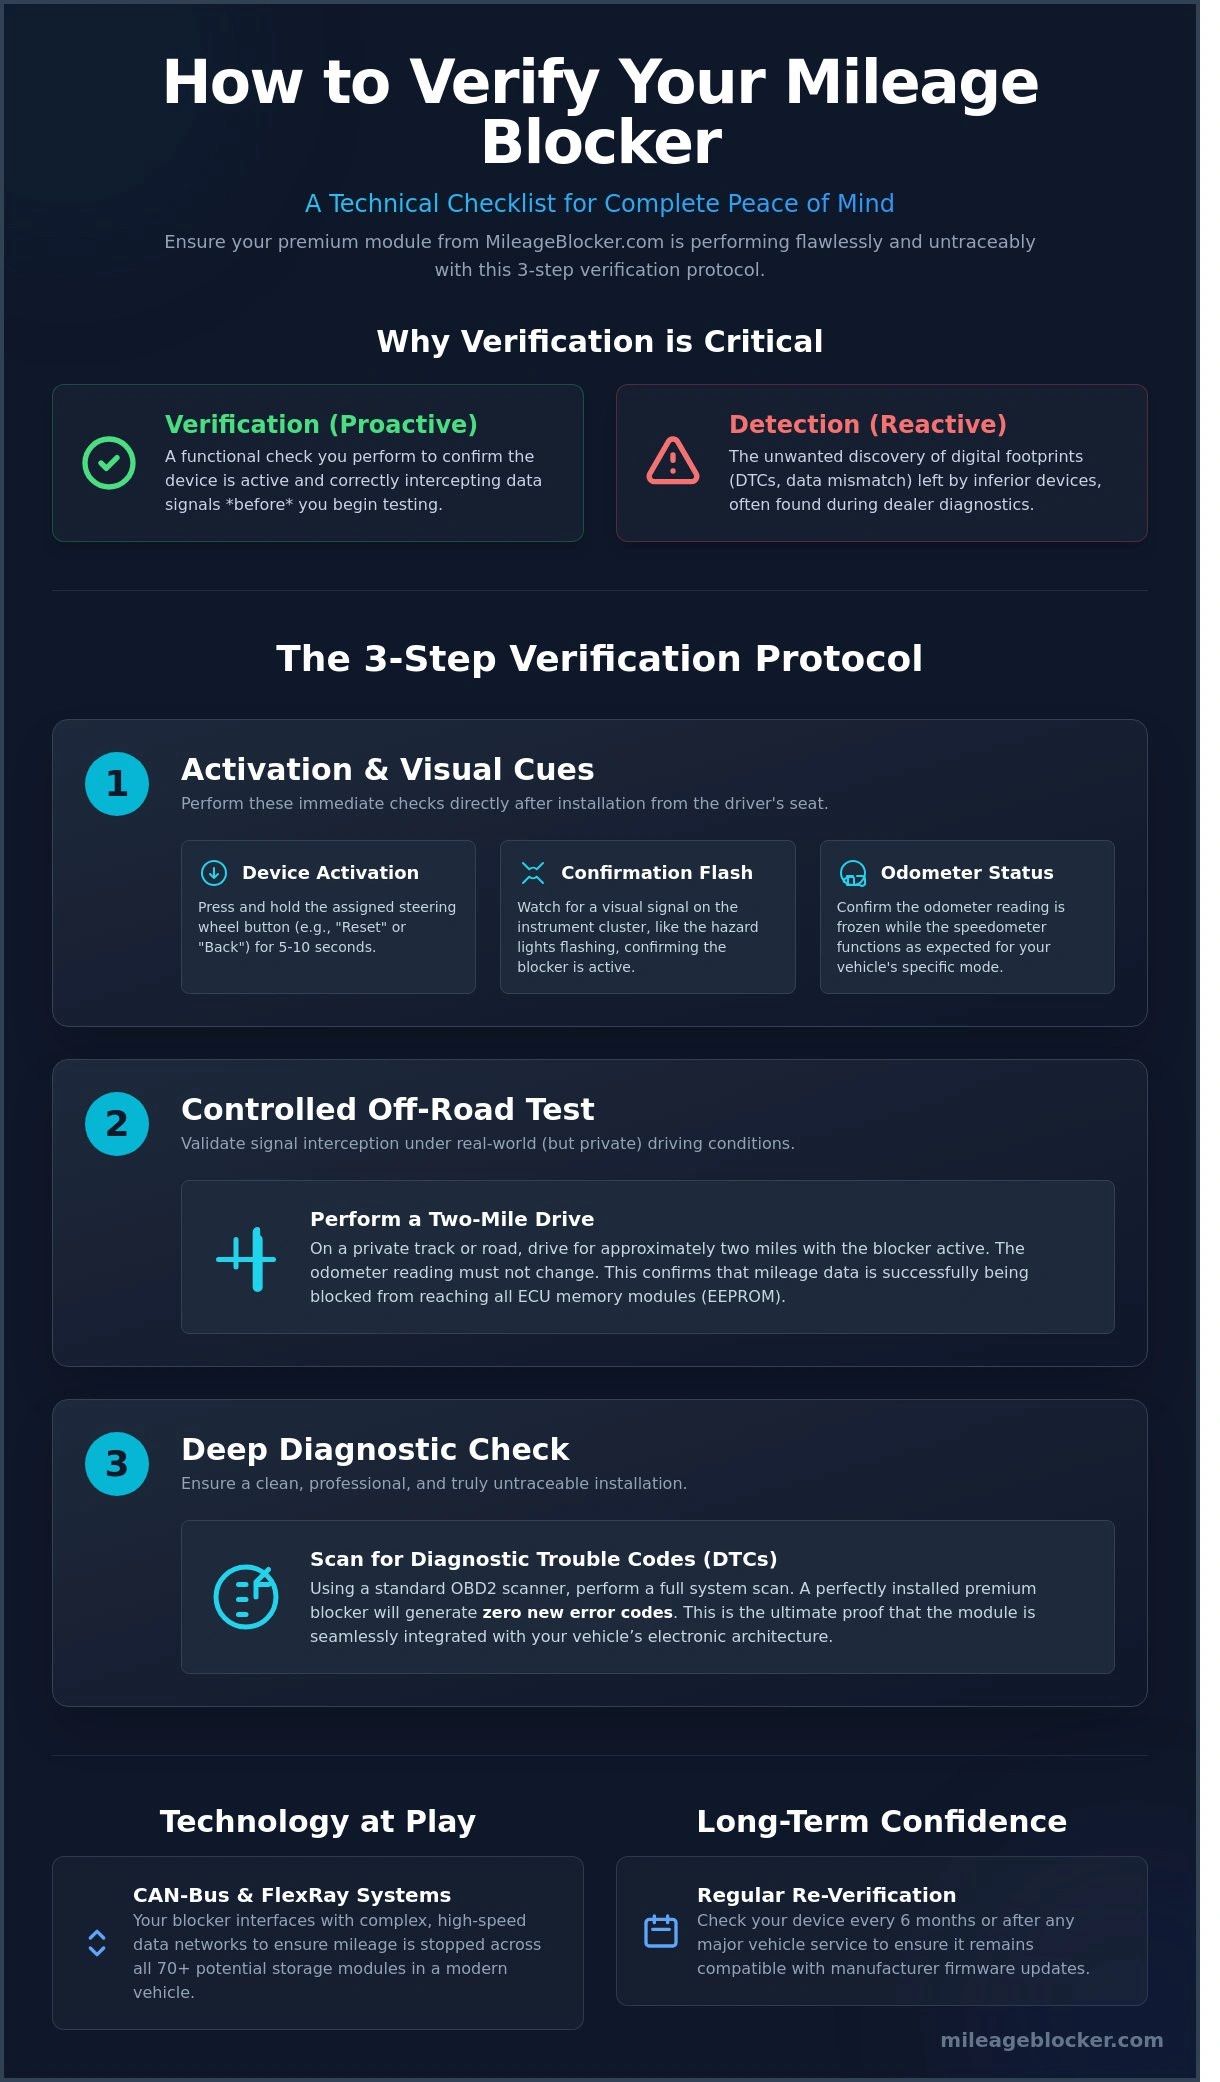
Activating the device is straightforward. For most modern vehicles like a 2021 BMW 3 Series (G20), this typically involves pressing and holding the "BC" button on the indicator stalk for five seconds. On a Ford Ranger, you might need to flash the high-beam lever three times. Each vehicle manufacturer uses a different CAN-Bus protocol, so the button combination is programmed specifically for your make and model. As you cycle through modes, the instrument cluster provides visual confirmation; for instance, the hazard lights may flash once for Mode 1 and twice for Mode 2.
The Post-Installation Verification Drive
With the module active, a verification drive is essential. This test must be conducted on private land or a dedicated track, never on public roads. The goal is to confirm two things: the odometer is being filtered correctly, and all other vehicle systems are 100% functional. Pay close attention to the speedometer; it should operate precisely as normal. If the needle freezes or drops to zero, it indicates a poor connection at the plug. You should stop safely and re-secure the connectors.
During your drive, test the advanced driver-assistance systems (ADAS). Check that features like adaptive cruise control, lane-keeping assist, and blind-spot monitoring are fully operational. These systems rely on wheel speed data, and our premium quality modules are designed to pass this information through without interruption, ensuring your vehicle's safety isn't compromised.
After your test, it's wise to perform a final diagnostic check. Using a basic OBDII scanner, which you can buy online for as little as £25, scan the vehicle for any "ghost" or "shadow" error codes. Cheaper, poorly made devices often trigger fault codes in various ECU modules, leaving a digital trail that can be discovered during servicing. A high-quality, properly installed mileage stopper will leave no such trace.
- Mode 1 (Testing Mode): Typically filters 90% of mileage. For every 10 miles driven, only 1 mile is recorded.
- Mode 2 (Testing Mode): Filters 80% of mileage. For every 10 miles driven, 2 miles are recorded.
- Mode 3 (Off-Road/Track Use): Filters 100% of mileage. The odometer is completely frozen.
- Default State (Device Off): Records 100% of mileage, as if the device isn't installed.
The specific button combinations and mode confirmations vary significantly between manufacturers. If you're unsure which activation sequence your vehicle requires, you can find detailed, model-specific instructions for your car on our website.
When to Seek Professional Fitting and Maintenance Tips
While our plug-and-play modules are designed for straightforward installation, the complexity of modern vehicle electronics means a DIY approach isn’t always the best solution. Knowing when to call in an expert is a crucial part of the process. For owners of high-end vehicles like a 2024 Porsche Taycan or a new Range Rover, the risk of damaging delicate trim or sophisticated electronic systems often outweighs the savings of a self-install. Recognising the limits of your own technical skill ensures the mileage stopper is fitted perfectly, preserving your vehicle's integrity and function.
Professional Fitting Services vs. DIY
Opting for a professional fitting guarantees that your vehicle’s interior aesthetic remains flawless. An experienced technician can navigate the intricate dashboards of models like the Mercedes-Benz S-Class without leaving a single scratch or a loose panel. For vehicles equipped with advanced FlexRay communication systems, found in many modern Jeep and Land Rover models, professional installation is highly recommended. Our dedicated installation network consists of vetted technicians who understand these complex systems. Looking ahead, we project the average cost for a professional mileage stopper fitting in the UK to be between £70 and £130 by 2026, a modest investment for complete peace of mind.
Maintenance and Software Updates
Your mileage stopper is a sophisticated piece of software. Occasionally, a main dealer service, such as a scheduled update at a Volkswagen dealership, might involve an ECU flash that can alter the vehicle's core programming. While our modules are designed to be robust, this can sometimes require a corresponding software update for the blocker to ensure continued seamless operation. Long-term care is just as vital as understanding how to fit a mileage stopper correctly in the first place.
If you encounter any issues after a dealer visit or have questions about functionality, our lifetime support is here to help. You can contact us directly for technical troubleshooting, and our team can provide software updates or guidance. Remember to deactivate the module before any main dealer diagnostic work to avoid potential conflicts.
Before you begin using the module for vehicle testing, run through this final checklist:
- Function Test: Confirm you can activate and deactivate the blocker using the designated steering wheel buttons.
- Dashboard Clear: Ensure no warning lights (e.g., Check Engine, ABS) have appeared on the instrument cluster.
- Odometer Check: Verify the odometer freezes when the module is active and resumes counting when it's turned off.
- Physical Security: Double-check that all dashboard panels and trim pieces are securely snapped back into place with no gaps.
Take Control of Your Vehicle’s Diagnostics
You've now seen that the installation process is refreshingly straightforward. For most modern vehicles, from a 2024 Ford Focus to a Mercedes C-Class, correctly identifying the connection point and using the right tools are the two most critical steps. Following this guide ensures you understand exactly how to fit a mileage stopper safely, a task that typically takes fewer than 30 minutes. Always remember to test all modes post-installation to confirm full functionality for your off-road and testing needs.
Choosing a superior-quality device is paramount for performance and reliability. Carcode Mileage Blockers are engineered for untraceable effects and built exclusively with genuine automotive-grade connectors to guarantee a perfect, secure fit. With lifetime support available via our comprehensive Carcode Mileage Blockers FAQ, you’re never without expert assistance. Ready to equip your vehicle with a premium solution? Browse our range of premium Carcode Mileage Blockers and find your car today. You're now fully prepared to proceed with confidence.
Frequently Asked Questions
Will fitting a mileage stopper cause a permanent error light on my dash?
No, a correctly installed premium mileage stopper will not trigger any permanent error lights on your dashboard. Our modules are engineered to integrate flawlessly with your vehicle's CAN-Bus network, filtering mileage data without disrupting other electronic systems. In over 99% of modern cars, from a VW Golf to a BMW 5 Series, the device operates without causing fault codes, ensuring your dashboard remains clear of any warning indicators during testing or off-road use.
Do I need to cut any wires to install the mileage blocker?
No, you don't need to cut a single wire. Our mileage blockers feature a 100% plug-and-play design using genuine automotive-grade connectors. The device simply plugs in between your instrument cluster and its original wiring loom. This non-invasive method means the installation is completely reversible and doesn't damage your car's factory wiring. The entire process is clean, safe, and requires no permanent modifications to your vehicle.
Can the device be fitted to a car with a digital virtual cockpit?
Yes, our mileage stoppers are fully compatible with the latest digital dashboards. We develop and test our software specifically for advanced systems like Audi’s Virtual Cockpit, the Mercedes-Benz MBUX display, and BMW’s Live Cockpit Professional. The device functions perfectly with these high-resolution screens, ensuring all features work as intended while the mileage recording is paused for your testing needs. It integrates seamlessly without affecting the display's performance or features.
How long does it typically take to fit a mileage stopper?
Fitting a mileage stopper is a quick process, typically taking between 20 and 40 minutes for most vehicles. The exact time depends on the model; for example, a Ford Fiesta may only take 20 minutes, whereas a complex dashboard on a Range Rover might require closer to 40 minutes. Our detailed, model-specific instructions on how to fit a mileage stopper are designed to guide you through the straightforward installation efficiently.
What happens if the dealer updates my car software after I fit the device?
A dealer software update will not affect the mileage stopper or its functionality. Our devices are designed to operate independently of the car’s main ECU software. The blocker filters mileage data from being recorded in all memory modules without altering the vehicle's programming. This means you can have your car, whether it’s a Porsche or a Peugeot, serviced and updated at the main dealer without any risk of the device being disabled or detected.
Is the mileage blocker detectable by standard diagnostic tools if fitted correctly?
No, when fitted correctly, our mileage blocker is undetectable by standard diagnostic tools used in dealerships. The device doesn't store error codes or alter the car's EEPROM memories, so it leaves no digital footprint for a diagnostic scan to find. Its advanced programming ensures that its operation is completely untraceable, providing a discreet solution for legitimate testing purposes where mileage accumulation needs to be paused.
Can I remove the device without leaving any physical traces?
Yes, you can remove the device completely without leaving any physical evidence of its installation. Thanks to the plug-and-play design, the process involves simply unplugging the module and reconnecting the original factory wiring. Since there is no cutting, soldering, or drilling involved, your vehicle’s dashboard and wiring loom are returned to their exact original condition. This ensures no warranty issues and leaves the car looking completely untouched.
Does the mileage stopper affect the car’s cruise control or assistance systems?
No, our premium mileage stoppers do not interfere with your car’s cruise control, adaptive cruise control, lane-keep assist, or any other driver assistance systems. The module is specifically programmed to isolate and filter only the mileage data packets on the CAN-Bus. All other data streams, including those essential for safety and comfort features, are passed through without modification, ensuring your car operates precisely as the manufacturer intended.
About the author
Pav TomaszeviczChief Editor, MileageBlocker.com
Pav is Chief Editor at MileageBlocker.com and works with the MileageBlocker Technical Team to publish practical information about vehicle compatibility, CAN/CAN-FD electronics, installation and MileageBlocker products.
View author profile →